/* jquery */ /* jquery accordion style*/ /* jquery init */

Learn Python - Why PyGame?

Trying your hand at game programming is an excellent way of honing existing coding expertise and gaining new skills.

Unfortunately, creating even a simple game with the Python language and its Standard Library requires considerable levels of skill and knowledge.

However, and not for the first time, Python's extensive collection of modules comes to the rescue. The PyGame module is designed to ease the path to game creation with a rich set of specialised, yet easy-to-use functionality.

In the following posts we'll explore some of PyGame's potential and demonstrate how it can kick-start your game programming skills.

PyGame Overview
PyGame Installation
PyGame Events
PyGame Event Handling
PyGame Colours
PyGame Init Code
PyGame Screen Drawing
PyGame Complete App

A post from my Learn Python on the Raspberry Pi tutorial.

Learn Python - Tom The Turtle

Up to now we've drawn some patterns and shapes, but we've seen nothing that looks much like a turtle. Let's put that right.

Before starting to issue move commands we can create a turtle object. We can give this object a name, and define a turtle-like shape.

It's done like this:

tom = turtle()
tom.shape("turtle")
tom.color("red")

These three lines will create a turtle called Tom, with a real turtle shape, filled with a bright red colour.

We can command Tom to move around the around the screen just as before, like this:

tom.circle(100)
tom.right(45)

Next time I'll show you how to control two turtles at once for some synchronised stomping.

A post from my Learn Python on the Raspberry Pi tutorial.

Learn Python - Turtle Shapes

This time, rather than drawing patterns with lines we'll use shapes filled with colour, like this...

Let's get started. Open an new file in your editor and save it as 'turtle-shapes.py'.
Now type in the code below:

from turtle import *

# set a shape and colour
shape("circle")
shapesize(5,1,2)
fillcolor("red")
pencolor("darkred")

penup() # no drawing
goto(0, -100)

# main draw loop
for i in range(72):
  forward(10)
  left(5)
  tilt(7.5)
  stamp()

exitonclick()

The first thing this program does is define the turtle shape with the shape function call. Here we are going to use a circle, but it could also be a triangle or a square.

On the next line we have a shapesize function call with three parameters. These specify the shape length, width and outline thickness respectively. Here the parameter values 5,1,2 will stretch our circle to create a thin ellipse.

We fill the ellipse shape with colour using the fill function. Here we've set it to red. We've also set the pen colour, to provide a contrasting shape outline colour. So, now our turtle is solid red ellipse with a dark red outline.

The next line issues a penup command. This raises the turtle's pen and stops it from drawing a line as it moves. It will become clear why we do this shortly.

By default our turtle is positioned at the centre of the window. However, for this program we need to move it a little first, to create room for our pattern. Although we could use the standard turn and movement commands, this time we'll use the goto function call because it can be done in a single command.

The goto command instructs the turtle to move to a new position relative to its current location. The move is specified as X and Y axis movements. The first X parameter is zero, so we won't move left or right. But, the Y value is -100. This moves the turtle down the screen by 100 steps.

Now we have the main draw loop, which repeats 72 times. Each time it will move forward 10 steps, turn left 5 degrees, tilt our ellipse shape by 7.5 degrees and do a stamp. What does stamp do? Stamp will leave an impression of our turtle, namely our red ellipse, on the screen.

Save the code and run the program, to see the stamped red ellipses gradually build up a pattern. Yet there's loads of ways to modify this program.

Try different values for forward, left and tilt in the loop and discover what sort of patterns are generated. You might be surprised at the results.

The shape of the ellipse can be altered by using different parameter values in the shapesize function call. And, of course, you're free to use any colour, or colours, you like.

A post from my Learn Python on the Raspberry Pi tutorial.

Learn Python - Turtle Patterns

Now let's draw some circles to create a pretty pattern, like this...

Does it look somewhat familiar? For those who remember, it's strikingly similar to the designs generated by the classic Denys Fisher Spirograph game.

To start use the Geany 'File->Save As' menu option save the square drawing program as 'turtle-circles.py'.

We only need to do a minor code change, namely replace the 'forward(200)' line with 'circle(100)'. The new listing will look like this:

from turtle import *

pencolor("blue")
pensize(5)

for i in range(4):
  circle(100)
  right(90)

exitonclick()

Save your changes and run the program. We now have four circles arranged in a pattern.

Let's make a few more changes. Modify the code to look like the listing below:

from turtle import *

pensize(5)

for i in range(4):
  for c in ["red","green","blue"]:
    pencolor(c)
    circle(100)
    right(30)

exitonclick()

Save your changes and run it again.

As you can see we now have two loops, one inside the other. This will draw a circle a total of twelve times (4 x 3). And by changing the pen colour in the inner loop, we've generated a multi-coloured pattern.

Are you starting to see the possibilities turtle graphics can offer? Next time we'll move onto creating solid-colour shapes.

A post from my Learn Python on the Raspberry Pi tutorial.

Learn Python - Draw In Colour

While our turtle move program looks good, we can make a few improvements.

There are two things we can fix:
• Firstly, there's quite a bit of repeated code
• Secondly, the thin black line looks a little drab.

So, let's edit the code as shown in the listing below:

from turtle import *

pencolor("blue")
pensize(5)

for i in range(4):
  forward(200)
  right(90)

exitonclick()

Save the code and run the program to discover what happens now. See the difference?

After the import statement we've added the pencolor and pensize commands. These settings will cause our turtle to draw a thick blue line.

More importantly, we've put the movement commands into a for loop. This loop repeats the forward and right commands four times - a much neater coding solution.

A post from my Learn Python on the Raspberry Pi tutorial.

Learn Python - Move That Turtle

Let's dive in and draw squares with the turtle graphics module and a sequence of turtle movement commands.

In the Geany editor and create a new file called 'turtle-square.py', and enter the following code:

from turtle import *

forward(100)
right(90)
forward(100)
right(90)
forward(100)
right(90)
forward(100)
right(90)

exitonclick()

Save your typing and run the program using the Geany 'Build->Execute' menu option, or F5 key. You should see a new window appear and a square being drawn.

So, what's actually going on here?

First there's the import statement. As we saw earlier with TKinter GUI module using this style of import means we don't need to use a 'turtle.' prefix for every function call.

Now for our turtle move commands. Imagine you are drawing a square on a piece of paper using a pencil and a ruler. We can imitate the motion of the pencil with a series of directional and turn commands sent to our turtle.

The first command is the 'forward(100)' function call. This will move 100 steps in the direction the turtle is already pointing, drawing a line as it goes. Next we need to turn the turtle. The command 'right(90)' turns the turtle by a specified angle, in this case it's 90 degrees.

Now we simply repeat the 'forward' and 'right' commands another three times, to finish drawing our square.

The last line just ensures we can see what the turtle has drawn before the window closes. The program waits until we click somewhere inside the window - or the window's close button is clicked.

And there you have it, your first turtle graphics program.

A post from my Learn Python on the Raspberry Pi tutorial.
Learn Python - The Turtle Module

So, how do we access all this fun with Python? Well, it's all down to a module called turtle, which has a collection of Logo-like commands, implemented as functions - plus some useful window and event management features.

The turtle module's functionality is split into a number of categories. In broad terms these are:

 turtle movement
 pen control
 colour and fill settings
special shapes
window management
event handling

Installation

The turtle module is already installed with Python 3, but not always there with Python 2.7. To check start new a Python interactive session and enter this statement:

>>> import turtle

If you see an error message about a missing module, don't worry. Presuming you are running the standard Debian Linux image, make sure the Raspberry Pi is connected to the Internet, open a Terminal window and type the following command:

sudo apt-get install python-tk

If prompted enter the password you used to login in with, and reply y to any prompts.

Now we can write our first turtle graphics code.

A post from my Learn Python on the Raspberry Pi tutorial.

Learn Python - What is Logo?

Logo is an interesting computer language.

While its origins go back to the 1960s, in recent times Logo has been associated with something called turtle graphics. The idea is to draw pictures and generate patterns by issuing commands to a screen-based turtle.

Logo has a lot going for it. It's a language based on simple commands, using words that even the youngest primary school pupil will understand. Words such as 'forward', 'backward', 'left' and 'right'.

Despite being very easy to learn, Logo programs illustrate a number of very important concepts. Concepts that include geometry, graphical design, various computer programming techniques, and an introduction to artificial intelligence (AI) through Logo-controlled robots.

Unsurprisingly, these attributes caught the eye of educators. Educational establishments right across the board, from Primary Schools all the way to Universities, have incorporated Logo programming into their classrooms and lectures.

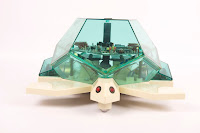
When combined with mechanical turtles - floor-traversing robotic devices drawing on large sheets of paper with coloured pens - it seldom fails to generate keen interest and attention-grabbing engagement with students of any age. One of the most successful turtle robots was the Valiant Turtle (see image). Design by Dave Catlin 1983 it won a Best of British Design award and was manufactured right up until 2011.

In future posts I'll demonstrate how we can use Python to emulate the Logo programming language, while showing just how simple and fun turtle graphics can be.

A post from my Learn Python on the Raspberry Pi tutorial.