/* jquery */ /* jquery accordion style*/ /* jquery init */

From tkinter to AppJar (part 3)

In the previous tutorial, From tkinter to AppJar (part 2), we converted the file search tkinter app from an earlier tutorial to a shorter 30 line AppJar app.

This time we'll take the same file search app and add new code lines to enhance the user interface's look and feel via a series of configuration options.

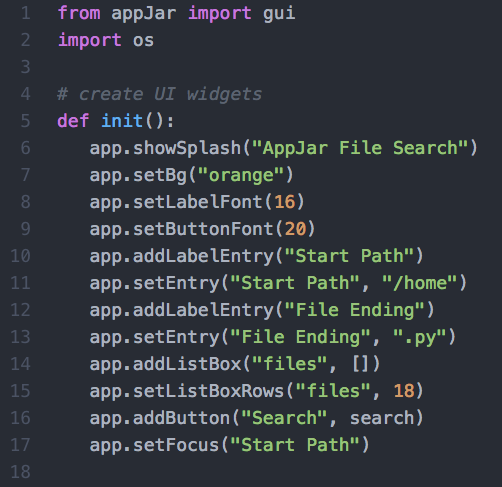
With your favourite Python 3 editor open the previous file search code listing, then change the init() function to look like the listing below:

Let's take a closer look at the behaviour introduced by these new code lines.

On line 6 we create a splash screen with an appropriate text label.

On line 7 we set the background colour of the app window, in this case to orange.

On lines 8 and 9 we set the font size of the text labels and the buttons. Notice here the button font size is a little larger than the label font size.

Finally, on line 17 we ensure the "Start Path" text entry field is associated with the initial cursor focus.

You can find more information on AppJar's extensive widget collection and configuration capabilities at the official AppJar website.

Try My Free Raspberry Pi Python Coding Tutorials

From tkinter to AppJar (part 2)

In the previous tutorial, From tkinter to AppJar (part 1), we converted a simple tkinter app to a short 8 line AppJar app.

This time we'll try out some of the other App Jar widgets by converting a tinter-based file search app from a previous tutorial.

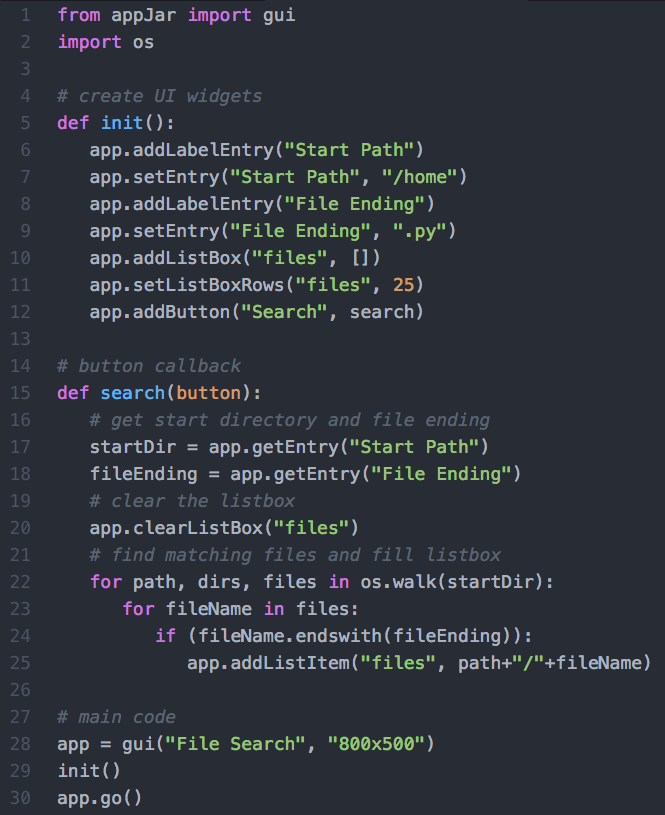
With your favourite Python 3 editor, open a new code file and enter this code:

As you can see, we've replicated the functionality of the 53 line tkinter file search example with just 30 lines of AppJar code.

In part 3 we'll add new code lines to enhance the user interface's look and feel via a series of configuration options.

Try My Free Raspberry Pi Python Coding Tutorials

From tkinter to AppJar (part 1)

As part of my free Raspberry Pi Python Coding tutorial series I showed how to create Graphical User Interfaces with the tkinter module.

However, while it's a very flexible piece of software, writing tkinter apps tends to involve quite a bit of code. In this post I'll look at a lightweight GUI alternative called AppJar.

Although App Jar is based on tkinter, it removes the need for much of the so-called 'boilerplate' code. And this means we can focus our attention on widget-based UI design.

Install AppJar

First, you'll need to install AppJar.

The easiest way is to use the following pip command:
sudo pip3 install appjar

Alternatively, download Appjar, unzip it and move the appjar folder to your source code folder.

Simple AppJar Example

Let's start with an AppJar version of my single button callback tkinter tutorial (which included a detailed walk-through of the code).

With your favourite Python 3 editor, open a new code file and enter this code:

Notice the size of this program. We've replicated the functionality of the 25 line tkinter example with just 8 lines of AppJar code.

In part 2 we'll converting a tinter-based file search app to App Jar.

Try My Free Raspberry Pi Python Coding Tutorials

micro:bit MicroPython Animate Class

MicroPython for the micro:bit has a useful collection of images. And you can create your own custom LED images too. This time we'll write code to create an animation based on a collection of these images.

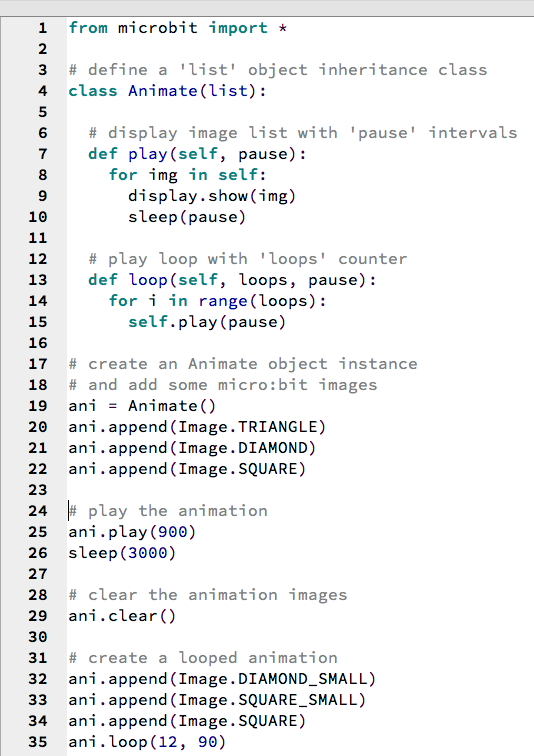
Python's list data type is ideal for our image collection. So, we'll define a class that inherits from the list data type. In this way we automatically have all the functionality of a list object and only need to add our own custom class methods.

In this case we're going to add two methods, the first to play (line 7) the image animation and the second to loop (line 13) through a series of animation plays.

Here's the code:

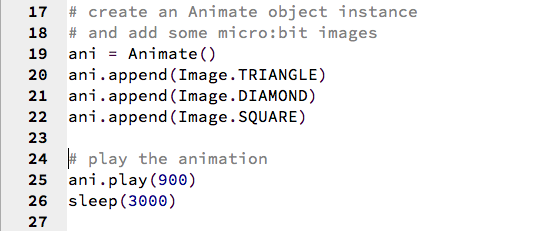
Now we've defined our class we can create an instance of the Animate class (line 19), then add a number of images using the append method inherited from the list data type. All we need to do now is call the play method (line 25) to display the animation, specifying the pause interval in microseconds.

Next we remove the image collection (line 29), using the clear method inherited from the list data type, then add more images. Finally, we call the loop method (line 35), specifying the number of loops and the pause interval in microseconds.

Here's the compete code listing:

Return to the micro:bit MicroPython Coding Tutorials page.

micro:bit MicroPython Animation Code

MicroPython for the micro:bit has a useful collection of images. And you can create your own custom LED images too. So let's write some code to animate a collection of these images.

We'll use Python's built-in list data type to hold our image collection. After adding the images with the append method we can create a for loop to iterate through the list.

Here's the code:

from microbit import *

# create an empty list
images = []

# add images to list
images.append(Image.TRIANGLE)
images.append(Image.DIAMOND)
images.append(Image.SQUARE)

# display each image in the list
for img in images:
   display.show(img)
   sleep(1000)

Note there is a one second pause between the display of each image so we can clearly see each one.

If you'd like to add code that builds a new image collection first use the clear method to remove the old images, like this:

images.clear()

Next time we'll see how to create an Animation Class that incorporates both one-time play and looping functionality.

Return to the micro:bit MicroPython Coding Tutorials page.

Thonny for RPi and micro:bit

In a previous blog post I talked out the benefits of the Thonny Python IDE.

Now the latest Raspbian Stretch operating system for the Raspberry Pi family has an updated Thonny release.

In addition, if you click the Menu > Programming > Thonny (Simple Mode) option you'll find all the essential window panes for writing Python code, with the most common features just a click away via generously-sized icons.

And for micro:bit MicroPython coding fans there's a micro:bit Thonny plugin to download and try out.

Try My Free Raspberry Pi Python Coding Tutorials

Java 9 and the Raspberry Pi

The Java coding language has been included in the Raspberry Pi's official Raspbian distro for some time now. Java 9, the latest incarnation of the language due for release in Autumn 2017, introduces raft of enhancements.

In this post I'll touch on some Pi-centric key aspects of Java 9, namely the new Java Shell, modularity and jlink, plus CPU support.

Java Shell - about time

Python has always had a read-eval-print loop (REPL) command-line option. It's a great way for newbies to get to grips with the coding basics and the language syntax.

Until now Java hasn't had a REPL option. But version 9 comes with jshell. Key features are: instant feedback, optional semicolons, a range of pre-imported libraries (like io, math, net and util) and a handy collection of slash commands to load, save, manipulate and analyse source code.

You can experiment with shell now in the Java 9 early release.

Modularity and JLink - smaller and faster

As your Java project grows the number of libraries and their dependencies starts to get increasing complex. This can mean your programs are slower to load and execute. Project Jigsaw set about changing this picture by breaking things up into a collection combinable blocks for system, jdk, source code and binary runtime elements.

This work lead to Java 9's new requires keyword, which helps to identify library dependencies. When compiling a runtime image this information is used by 'jlink' to assemble and size-optimize a binary runtime image.

CPU Support - not all Pi models

Java 9 takes advantage specific CPU instruction sets commonly found in modern 64-bit processors, like the ARM v7/8 CPUs and x86 range. This move will help improve runtime performance.

However, as of today, this does limit Java 9 to the Raspberry Pi 2 and Pi 3 boards. Owners of model As, Bs and Zeros, with their older ARM v6 processor chips, will therefore have to keep using Java 8.

Read all my Java coding posts

Thonny Python REPL on the Raspberry Pi

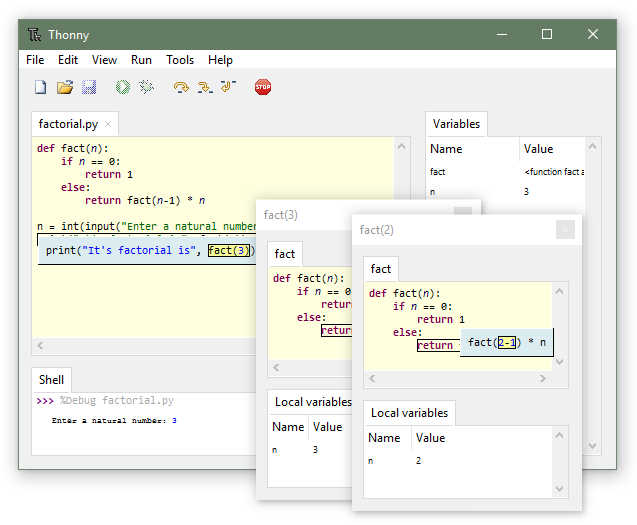
Thonny IDE

Python coders who use the latest Raspberry Pi Raspbian Pixel distro will find the Thonny Python REPL development tool is pre-installed.

Thonny is a far better development option option than IDLE or many other Python editors. Thonny comes with Python 3.6 built-in, has many pro-level features, yet retains an easy-to-use user interface.

Thonny's advanced features include:

• Code completion: helps beginners explore the Python language and reduce typos

• REPL Shell: quickly try out Python statements and play with new packages

• Deep Code Debugger: step through actual code elements and expression evaluations

• Variable Viewer: monitor the value of your variables in real time

• Function Call Visualisation: including a way to see how recursion works in practice

• Syntax Error Highlighting: identifies common errors like missing quotes or parentheses

• Scope Detection: ensures local variables are visually distinguishable from global variables

Sound interesting? Then head over to the Thonny.org webpage where you'll find additional information, a Thonny in action video demo, plus download instructions for older Raspbian distro releases or Windows, macOS and Linux.

And there's more helpful information in an online MagPi Thonny tutorial.

Try My Free Raspberry Pi Python Coding Tutorials

Tkinter Coding with AppJar and GuiZero

Previously we had a look at creating Graphical User Interfaces with Tkinter as part of my free Raspberry Pi Python Coding tutorial series.

Tkinter is certainly a very flexible piece of software, capable of implementing all kinds of user interface (UX) designs. However, the lines of code needed to create usable solutions tends to rise quite quickly. This can make things a little difficult for those with relatively limited Python coding experience.

Recently a couple of Tkinter-based Python modules have started to address this issue. One is GuiZero and the other is AppJar.

The idea behind these modules is to simplify the creation of grid-styled form-based apps, while still supporting a wide variety of widgets. Both are easy to install and use. Although be aware that as they are still in development sfeatures are subject to change and you may encounter the occasional bug.

AppJar documentation is based around a 'code sandwich' metaphor with a menu of widget-based fillings. Code examples include Minecraft interaction and there's also a series of hands-on AppJar coding tutorials.

The GuiZero documentation is also straightforward to follow with plenty of code examples, such as how to use the multi-cell Waffle grid layout.

Try My Free Raspberry Pi Python Coding Tutorials

CoderDojo micro:bit MicroPython Sushi Cards

Here are details of the Sushi-style cards I created for the CoderDojo organisation.

Two ways to start MicroPython coding with your USB-connected micro:bit board.

• Quickest - point your web browser to the official MicroPython coding website.

• Most Flexible - download the free Mu MicroPython Editor, which is available for Windows, macOS, Linux and the Raspberry Pi.

MicroPython code examples covering the LED display, the A/B buttons, plus the temperature, magnetometer and accelerometer sensors.

Try My Free micro:bit MicroPython Coding Tutorials

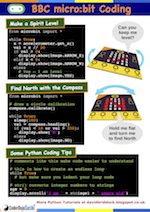
Magnetometer Compass (micro:bit MicroPython)

This time we'll take advantage of the micro:bit's magnetometer sensor (which detects magnetic fields) to build a North-finding compass app.

from microbit import *

# draw a circle calibration
compass.calibrate()

while True:
   sleep(100)
   val = compass.heading()
   if (val < 10 or val > 350):
      # the micro:bit is pointing North
      display.show('N')
   else:
      display.show(Image.NO)

Note that the magnetometer needs to be calibrated before we use it. This is done by tipping the micro:bit around to draw a circle on the LEDs. Be aware that sometimes the magnetometer calibration can be affected by the magnetic fields emanating from an electronic device, such as a computer.

As a coding challenge you could try to add compass directions for South, East and West.

Return to the micro:bit MicroPython Coding Tutorials page.

Spirit Level (micro:bit MicroPython)

This time we'll create a spirit level that uses x-axis data from the micro:bit's built-in accelerometer sensor.

from microbit import *

while True:
   # obtain the accelerometer x-axis value
   x = accelerometer.get_x()
   # perform an integer division
   val = x // 20
   # test the value
   if val > 0:
      display.show(Image.ARROW_E)
   elif x < 0:
      display.show(Image.ARROW_W)
   else:
      # Yes – I am level
      display.show(Image.YES)

The micro:bit's accelerometer is sensitive to the slightest movement. In fact, it is too sensitive for our purposes. So here we take the returned accelerometer x value and divide it by 20 using the integer divide // symbol.

For a simple coding challenge try changing the integer division value from twenty to something smaller or larger, then discover how much harder or easier it is keep level.

A more advanced coding challenge would be to create a dual axis spirit level using both the get_x() and get_y() accelerometer functions.

Return to the BBC micro:bit MicroPython Coding Tutorials page.

Dice Shaker (micro:bit MicroPython)

In this tutorial we'll take advantage of the 'shake' accelerometer gesture to build a dice shaker, which can be used to play all kinds of games.

from microbit import *
import random

while True:
   if accelerometer.was_gesture('shake'):
      # generate a random integer from 1 to 6
      diceNumber = random.randint(1,6)
      # show the dice number
      display.show(str(diceNumber))
      sleep(1000)

Notice here we import the random MicroPython library module as well as the standard microbit library module.

After you've downloaded this program to the micro:bit try to shake a six!

As a extra coding challenge you could modify the code to simulate two dice (hint: the minimum throw is 2 and the maximum is 12).

Return to the micro:bit MicroPython Coding Tutorials page.

Capture Gestures (micro:bit MicroPython)

This time we'll capture movement gestures, as recognised by the micro:bit's built-in accelerometer sensor.

from microbit import *

while True:
   # obtain the current gesture
   g = accelerometer.current_gesture()

   # is the micro:bit face up or face down?
   if g == 'face up':
      display.show(Image.HAPPY)
   else:
      display.show(Image.SAD)

Once again we indent the main code inside a While True: endless loop so the program can continuously test for gesture changes.

After you've downloaded and run this program on the micro:bit modify the code to discover other recognised gestures, such as: 'up', 'down', 'left', 'right', 'freefall' and 'shake'.

Return to the BBC micro:bit MicroPython Coding Tutorials page.

Temperature Sensor (micro:bit MicroPython)

In this example we obtain the temperature of the micro:bit processor, which rises quite quickly after it is powered on.

from microbit import *

while True:
   # obtain the CPU temperature
   t = temperature()
   display.scroll(str(t) + 'C')
   # wait 5 seconds before repeating
   sleep(5000)

Once again we indent the main code inside a While True: endless loop. However, this time there's a five second delay between each loop iteration.

Notice that we also use the str() function to convert the integer temperature value in the variable t into a string. Leaving it as an integer will result in an error condition when the program runs.

To see the temperature rise disconnect the micro:bit for a while, so it can cool down, then reconnect to downloaded and run the program. Next try modifying the code to display the temperature in Kelvin (hint: 0 Celsius is 273 Kelvin).

Return to the micro:bit MicroPython Coding Tutorials page.

Custom LED Images (micro:bit MicroPython)

Sometimes the pre-defined MicroPython images don't cover what we need.

However, the good news is we can design our own custom images. Here's how it is done:

from microbit import *

# build a string with 25 digits using the numbers from 9 to 0
# where 9 is maximum brightness and 0 switches the LED off
img = Image('99999:07770:00500:03330:11111')
display.show(img)

The micro:bit's 25 pixel LED display is arranged as a five row and five column grid. We can create our own image by setting an LED brightness value for each LED. A value of 9 represents the maximum brightness while a value of 0 switches the LED off.

The image defined by a long string of digits. This string is divided up into five sections, separated by a colon (:) character, with the first section representing the top LED row. And each section contains five digits, with the first digit corresponding to the first column.

After you've downloaded and run this program on the micro:bit modify the string to display your own LED images. It's a good idea to sketch out the pattern designs on paper first using a simple 5x5 grid pattern.

Return to the micro:bit MicroPython Coding Tutorials page.

Images & Animations (micro:bit MicroPython)

Here's how to display images and image animations on the LEDs.

from microbit import *

# images
display.show(Image.HAPPY)
sleep(2000)
display.show(Image.HEART)
sleep(2000)
display.show(Image.PACMAN)
sleep(2000)
display.show(Image.SNAKE)
sleep(2000)
# animations
display.show(Image.ALL_CLOCKS)
sleep(2000)
display.show(Image.ALL_ARROWS)

After you've downloaded and run this program on the micro:bit try out these other image names: SMILE, SAD, CONFUSED, ANGRY, ASLEEP, SURPRISED, SILLY, FABULOUS, MEH, YES, NO, TRIANGLE, TRIANGLE_LEFT, CHESSBOARD, DIAMOND, SQUARE, RABBIT, COW, MUSIC_CROTCHET, MUSIC_QUAVER, MUSIC_QUAVERS, PITCHFORK, XMAS, TARGET, TSHIRT, ROLLERSKATE, DUCK, HOUSE, TORTOISE, BUTTERFLY, STICKFIGURE, GHOST, SWORD, GIRAFFE, SKULL, UMBRELLA, SNAKE.

Return to the BBC micro:bit MicroPython Coding Tutorials page.

Capture Button Press (micro:bit MicroPython)

This little program display a different image when the 'A' and 'B' buttons are pressed.

from microbit import *

while True:
   if button_a.is_pressed():
      display.show(Image.HAPPY)
   if button_b.is_pressed():
      display.show(Image.SAD)

Here we use a While True: statement which create an endless loop. Make sure you use the correct indentation levels for the code inside the loop and inside the 'if' test statements to avoid errors when the program runs.

After you've downloaded and run this program on the micro:bit try changing the image names for the A and B buttons.

Return to the micro:bit MicroPython Coding Tutorials page.

Countdown Timer (micro:bit MicroPython)

Type in the following code to create a three second timer.

from microbit import *

display.show('3')
sleep(1000)
display.show('2')
sleep(1000)
display.show('1')
sleep(1000)
display.show('0')

Notice we put quotes around the countdown numbers so they appear as strings to the display.show() function.

After you've downloaded and run this program on the micro:bit have a go at building a 10 second timer.

Return to the BBC micro:bit MicroPython Coding Tutorials page.

MicroPython Coding with Mu

What is Mu?
Mu is a free BBC micro:bit code editor, written in Python 3, designed to run on Microsoft Windows, Apple Mac and Linux computers or the popular Raspberry Pi.

Why Mu?
Mu has built-in support for the MicroPython language. It can flash programs to the micro:bit with a single click. And it has a special panel to help locate and fix coding errors.

Install Mu
Visit the Mu website codewith.mu, then follow the download and install instructions for your PC or Raspberry Pi.

Using Mu
Here's what the most important Mu icons do:
  New, Load and Save manage your Python code files.
  Flash creates a '.hex' file and uploads it to the micro:bit.
  Repl opens a command console and error debugging panel.

Coding With Mu
To begin coding follow these steps:
  1) Connect the micro:bit to the PC with a USB cable
  2) Start the Mu app and open a New code file
  3) Type in your code (see below)
  4) Open the Repl window panel (in case of any errors)
  5) Click the Flash icon to transfer and run your program

Hello Code Example
Carefully enter these two lines of Python code into Mu, then click the Flash icon to transfer it to the micro:bit device.

from microbit import *
display.scroll('Hello!')

After watching the message scroll across the LED display try replacing 'Hello!' with your own message, remembering to put it inside the quotes ('').

Return to the micro:bit MicroPython Coding Tutorials page.

MicroPython Coding in 4 Simple Steps

Step 1
Connect your PC or Raspberry Pi to the micro:bit board with the USB cable.

Step 2
Using a web browser navigate to the python.microbit.org website.

Step 3
Now carefully enter these two lines of Python code into the editor...

from microbit import *
display.scroll('Hello!')

Step 4
Finally, click the 'Download' icon, select the micro:bit device and watch the message scroll LED display.

Create a Custom Message
Try replacing 'Hello!' with your own message, remembering to put it inside the quotes ('').

Return to the micro:bit MicroPython Coding Tutorials page.

micro:bit Overview

The micro:bit is a small embedded system designed to help schools teach coding and other constructional thinking activities.

Despite its diminutive size the board is loaded with features. The most obvious are the 5x5 LED matrix display and the two push buttons.

However, there's also temperature, accelerometer and magnetometer sensors, both radio and bluetooth wireless communication, plus an array of digital and analog I/O pins that interface connect the micro:bit to electronic circuits, additional sensors, robotic kits and other gadgets.

Once connected to a PC or Raspberry Pi via the USB cable you can write and download micro:bit programs using Code Blocks, MicroPython, C++ or Javascript/Typescript.

Return to the micro:bit MicroPython Coding Tutorials page.

2017 Raspberry Pi Challenges

It's 2017 so why not set yourself some new year Raspberry Pi challenges. Here's a few ideas:

Start coding in Python with my free in-depth Learn Python on the Raspberry Pi series of posts.

Use Python code to explore the downloadable Astro Pi CSV data from Tim Peake's ISS mission and create a Python Date Filter.

Build your own Astro Pi computer using a Raspberry Pi 2 or 3 and a Sense HAT.

Learn the Java programming language with tools like BlueJ (maybe using the BlueJ Learning Videos), or the Greenfoot IDE or Dr Java.

Customise the hackable Raspberry Pi Minecraft edition using Python code or with Java using BlueJ.

More Raspberry Pi Coding, Tips and Tricks