/* jquery */ /* jquery accordion style*/ /* jquery init */

Perfect Forward Security

Material surrounding the NSA's PRISM and MUSCULAR programmes, exposed in the Edward Snowdon documents, have generated much consternation in the IT industry. And the public aren't at all happy with the alleged capture, storage and analysis of their communications either.

Major technology organisations felt compelled to conduct a top to bottom review of existing security systems. Many have decided to significantly enhance and extend data security.

High on the list is the introduction of an encryption strategy called 'Perfect Forward Security'.

Enhanced Encryption

So, what exactly is Perfect Forward Security (PFS)? And how does it help secure our data?

At its core PFS is based on the highly regarded and well proven public-key encryption system. A system that relies on a pair of mathematically related keys. If you'd like to understand the nitty gritty technical details of key exchange they are expertly explained in this Wiki entry.

Despite widespread adoption the key-exchange scenario does have a flaw. If a private key is compromised all data - past, present or future - encrypted with this key can be viewed in plain text. For example Microsoft's outlook.com email service has historically relied on a single master key.

But it doesn't have be like this. PFS is specifically designed to address this problem. Originally introduced way back in 1992 by Whitfield Diffie (the key-exchange co-inventor), Paul von Ooschot and Michael Weiner, PFS describes a session-based station-to-station protocol.

This protocol mandates that both ends of the network channel work together to generate a new key set for each separate communication session. This means that owning a compromised key only allows an attacker to access information for one specific communication session. The next session will be encrypted using a different key set. So, adopting PFS greatly enhances data security.

Unfortunately there is small additional processing cost to generating new keys. While this isn't welcome the PFS configuration can be adjusted based on circumstances. For example the sensitivity of the information being transmitted or the security policies of various organisations involved.

Work In Progress

Google was one of the first major players to adopt forward security technology. As far back as 2011 Google switched on PFS for secure socket layer (SSL) encryption on its secure Search, Google+, Gmail, Calendar, Docs and other web services. Now it's using PFS for all its data centre internal network traffic to counteract further surreptitious data collection.

Microsoft has started a multi-phase plan to securely encrypt all stored user content and associated data transfers at every global data centre by the end of 2014. Key targets for enhanced encryption are the Outlook.com email facility, Office365, SkyDrive cloud-based storage and the Windows Azure suite of online services.

Yahoo CEO Marissa Mayer responded to the NSA surveillance allegations with a blog post to assure customers that, "Yahoo has never given access to our data centres to the NSA or to any other government agency. Ever." Mayer went on to confirm that Yahoo will enhance it's SSL security with 2048-bit level keys by January 2014 and all worldwide Yahoo data flows by the end of Q1 2014.

Twitter's announcement appeared in late November confirming it had implemented PFS on its main website, mobile site and API feeds. The configuration ensures new encryption keys are generated every time the user log in.

More To Do

As you might expect from a defender of digital rights and freedoms the Electronic Frontier Foundation (EFF) is keen to push for even wider PFS adoption. In a post on the EFF website it suggests all technology companies should seriously consider going down the same forward security route.

Yet there's still a long way to go. At the time of this post some big technology names are only just starting to think about how they address this area. Yet by mid-2014 any major services not supporting PFS are likely to attract plenty of negative media coverage.

Read more analysis posts.
Appcelerator Titanium: Mobile App Testing

The majority of your mobile app testing can be performed on your PC using Titanium's virtual device emulator window.

This tool offers a pretty good imitation of a real mobile device (iOS, Android, Blackberry, etc), including a complete graphical interface, complete with familiar features such as icons, menus and device unlocking.

However, it's not perfect.

Depending on the PC your using for development, you're probably missing out that all-important touch-interface experience.

And if your app interacts with the built-in camera, accelerometer, various other sensors or GPS positioning system can only be fully tested by using a real handset.

The steps necessary to deploy your app onto a real smartphone or tablet varies depending on the device brand and type.

For Android, with it's USB interface, it's a fairly straightforward procedure. But when it comes to Apple devices you'll discover connectivity restrictions make iOS app deployment a rather more complex process.

Appcelerator Titanium: Kitchen Sink

So, you've spent some time playing with the IDE and tried your hand at a 'Hello World' app.

What Next?

You could study the documentation? But a more interactive way to explore the API is to load the Kitchen Sink project.

Appcelerator provide both a Desktop and Mobile versions of a Kitchen Sink app on the popular GitHib site. Just download the zip, extract the contents contents and Import the project file into your IDE.

Inside you'll find host of useful code examples that exercise different part of the API. These can be copied to other projects as is, or modified in any way you wish to customise the app behaviour.

Although it's an excellent starting point, it only covers a small fragment of the complete API. So, you'll have to dive into the online documentation from time to time.

Appcelerator Titanium: API

This API is split into numerous modules, each with its own collection of classes, properties and methods. Functionality to cover all aspects of app development.

The modules include Android, App, Calendar, Cloud, Contacts, Database, Facebook, Filesystem, Geolocation, Map, Media, Network, Platform, UI, XML and Miscellaneous.

Some, like the UI module, contain a huge amount of functionality, while other have just a few classes. The full Titanium API documentation is posted online, along with plenty of code examples.

In addition to this documentation there's loads of tutorial material. This includes an impressive list of videos suitable for all levels, from beginner to expert.

Appcelerator Titanium: Mobile SDKs

As I mentioned previously there's a few additional installation steps for developing mobile apps.

Although Titanium enables you to create software for iOS, Android, Blackberry and ether mobile platforms, you'll also need the associated development environments to build native apps.

If it's Apple's iPhone and iPad devices you're interested in then you will need an Apple Mac. This is because Apple's Xcode development environment is used by the Titanium toolset to build native iOS apps.

Apps for Google's Android platform are built using the Java-based Android development kit, So, this needs to be installed on your PC first. However, this time it's a cross-platform SDK, meaning you can use a Windows, Linux or OS X.

In a similar way building Blackberry apps requires another SDK installation. Once again it's a cross-platform kit for Windows, Linux or OS X.

Titanium's tight bindings to these platform-specific SDKs extends to the selection of specific OS profiles (or versions). This is important as not all users of your app will have the latest and greatest iOS, Android or Blackberry OS version.

Appcelerator Titanium: Getting Started

According to the online documentation Titanium officially supports these operating systems: Windows 7, Mac OS X 10.6 or later and Ubuntu 9.10 (both 32bit and 64 bit versions).

However, the relatively low resource requirements and cross-platform nature of the tools and development kits means, in practice, you can use Windows Vista and (probably) XP and a variety of Linux platforms.

Go to the product downloads page to obtain a Titanium Developer Tool installation file for your platform, which invokes a sign-up step to add yourself to the Appcelerator Community. The installation process includes accepting the Apache 2.0 licence agreement.

An investigation of the target installation folder reveals a collection of executable and web page script resources. And a quick look at the desktop confirms we have a new Titanium Desktop icon.

Appcelerator provide the Eclipse-based Aptana Studio. This excellent IDE has all the functionality you'll need to create, edit, build and debug your apps. It's also perfect for general web development activities.

The Titanium toolset is the only software you will need to create desktop applications. However, mobile apps require some additional steps, something I'll discuss later.

Appcelerator Titanium: WebKit Engine

Titanium achieves all this flexibility through a design rather similar to Adobe's AIR product, but with a standards-based open source pedigree.

The key component is a platform-specific, WebKit derived runtime engine to render and execute the web pages and scripts as a native application.

WebKit technology is not only very popular – it's found in Adobe AIR's runtime and many browsers like Google's Chrome and Apple's Safari - but it allows developers to use the latest HTML5 and CSS3 standards, plus the powerful functionality offered by Javascript frameworks such as JQuery, Prototype, Dojo and MooTools.

Importantly, JavaScript behaviour and HTML/CSS rendering is consistent across all platforms, while still exhibiting an OS-specific look-and-feel. This is critical to achieving the best possible user experience on each platform - an important factor in gaining a high rating in the various mobile App stores and marketplaces.

Appcelerator Titanium: The Platform

Appcelerator is a development company, previously known for their SDK - a hybrid of client-side JavaScript library based on a custom Web Expression Language - and server-side web services supporting numerous application frameworks: Ruby on Rails, Google App Engine, Spring, Merb, Grails, and Pylons.

Titanium from Appcelerator is an open source platform for building Rich Internet Applications (RIAs) with web technology. As a concept it's nothing new, there are numerous commercial and open source competitors, including Adobe's AIR product. But two important differences set Titanium apart from the crowd.

Firstly, it enables developers to create native look-and-feel desktop and mobile applications using only open standard web languages. This means web-savvy developers can start creating applications immediately - without having to learn additional languages such as Java and Objective C, along with their extensive language-specific libraries and APIs.

Other than basic web scripting skills, the only additional requirement is some familiarity with Titanium's JavaScript Desktop and Mobile APIs. Titanium tools transform the web source into native windows and controls appropriate to the target platform.

Secondly, Titanium can take a single development project and build executable packages for any supported desktop or mobile platform. Application package targets already include Windows, Mac OS X and Linux desktops, together with Android smartphones/tablets and Apple's iOS iPhone/iPad devices and Blackberry devices.

The flexibility of a cross-platform solution, where you write the code only once, then deploy it to multiple platforms is very attractive.

Microsoft Positivity

Microsoft's latest results look incredibly positive. This is especially true in the area of cloud computing, and in particular Office 365 and Windows Azure.

Office 365 subscribers have passed the 2 million mark. Many home users need access to the real thing (rather than office-like alternatives) and a subscription offers great value. The same subscription model suits businesses too as it keeps costs under control.

As for Window Azure it continues to make big strides. While there's a long way to go before it reaches Amazon's hold on this segment of the marketplace it's already well ahead of the rest, including Google's App Engine and the various offerings from IBM, HP, Oracle and such.

Why is this? As I showed in my recent articles (part 1 and part 2) Azure not only has enviable technology scope but is also a leader in promoting openness. Openness in service access, in coding languages, in frameworks, in industry standards and in development tools. How things change...

Obviously Microsoft needs to change to survive. And it is. More importantly lots of organisations and influential developers are noticing. Momentum is growing and it would seem the only way is up.

Read more Microsoft analysis posts.

Raspberry Pi Minecraft with BlueJ

Mojang created a special Raspberry Pi version of Minecraft specifically to encourage game hacking. This free version of the game includes Python and Java API's.

The API and Demo packages contain numerous classes. But what's a good tool for navigating the code?

Well, a visual way to begin Minecraft hacking in Java is with the BlueJ editor.

A recent Michael Kolling's Oracle Java Magazine article demonstrates how to install and run the Pi-friendly BlueJ 3.14 on your Raspberry Pi.

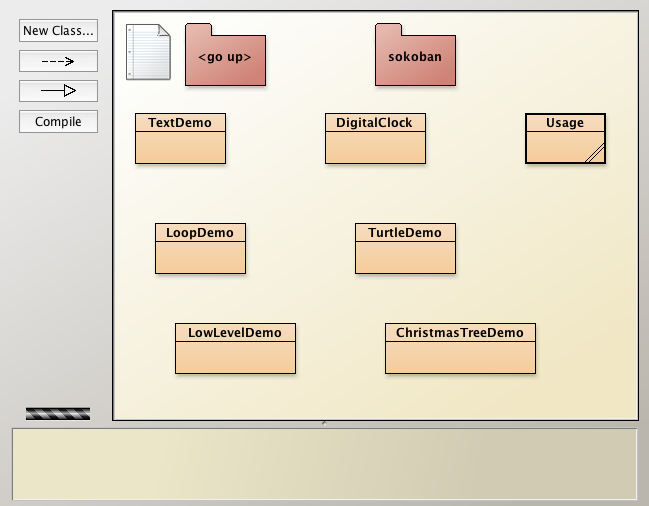
Open the API root source file folder as a Non-BlueJ Project. Now you'll have a class diagram for each package and a syntax-highlighting editor to browse the code. You can do the same for the Demo source code.

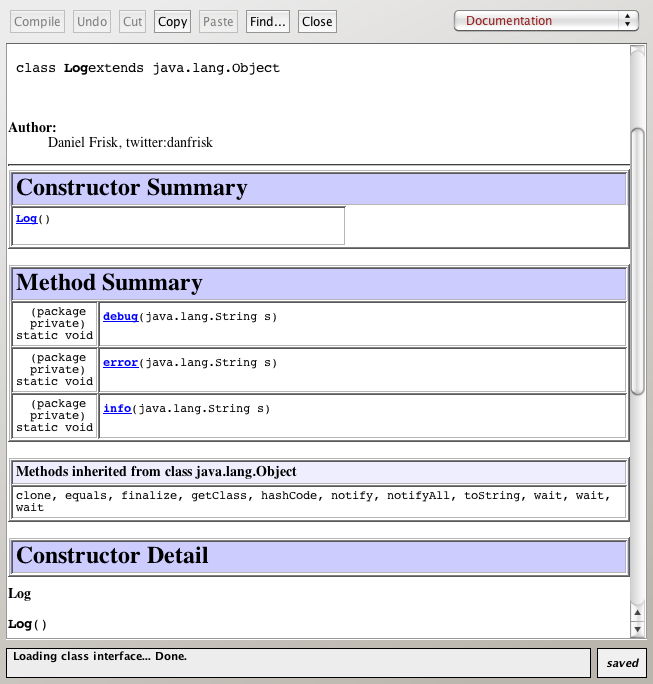
The images below give a flavour of how it will look.

The main 'pi' package:

The pi.event package:

The pi.demo package:

Source code for the LowLevelDemo class:

Javadoc for the Log class:

More Raspberry Pi Coding, Tips and Tricks

Raspberry Pi BlueJ Learning Videos

Are you just starting to code with the Java language and looking for a little help?

As I discussed previously the BlueJ editor is a great tool for beginners.

Recently I noticed object first with java, a comprehensive collection of videos which walk you through the basics of Java development with the BlueJ editor.

At the time of this post there's twelve in the collection.

More Raspberry Pi Coding, Tips and Tricks

Raspberry Pi Java with BlueJ

So the Raspberry Pi has a new performance-enhanced port of Oracle Java programming language.

But some of the traditional Java IDEs like Eclipse and Netbeans are large, memory-hogging applications. Is there a more Pi-friendly alternative?

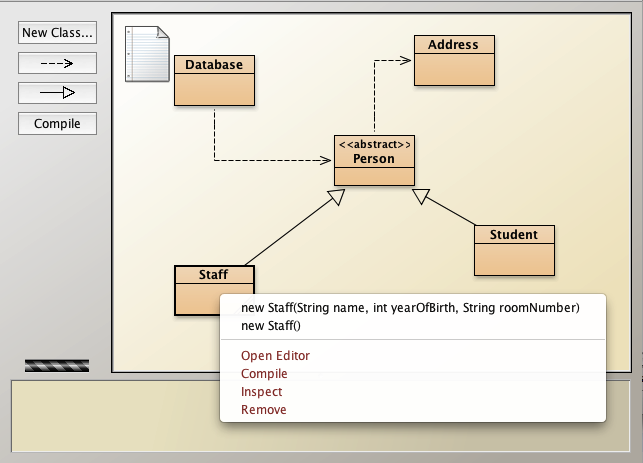
The BlueJ Java programming environment aims to teach the fundamentals of object orientation (OO) design. While similar in concept to the closely related Greenfoot project BlueJ is targeted at students or anyone wishing to explore modern programming concepts through experimentation.

A graphical programming interface helps to visualise the high-level OO design, as opposed to just diving into the code. Behind the scenes there a full source code editor with built-in compiler, syntax-highlighting, scope-visualisation and auto-completion, plus an interactive testing mode.

It's an ideal solution when working with an unfamiliar set of Java classes, such as Mojang's Minecraft API for the Pi.

A recent Michael Kolling's Oracle Java Magazine article demonstrates how to install and run the Pi-friendly BlueJ 3.14 on your Raspberry Pi.

Alternatively, if your Pi is running the Raspbian image the BlueJ website has a Debian-specific .deb file download. After downloading move to the download directory, then execute this command in a terminal window:

$ dpkg -i bluej-314.deb

Below is a screenshot of BlueJ in action:

More Raspberry Pi Coding, Tips and Tricks

Raspberry Pi Java with Greenfoot

So the Raspberry Pi has a new performance-enhanced port of Oracle Java programming language.

But some of the traditional Java IDEs like Eclipse and Netbeans are large, memory-hogging applications. Is there a more Pi-friendly alternative?

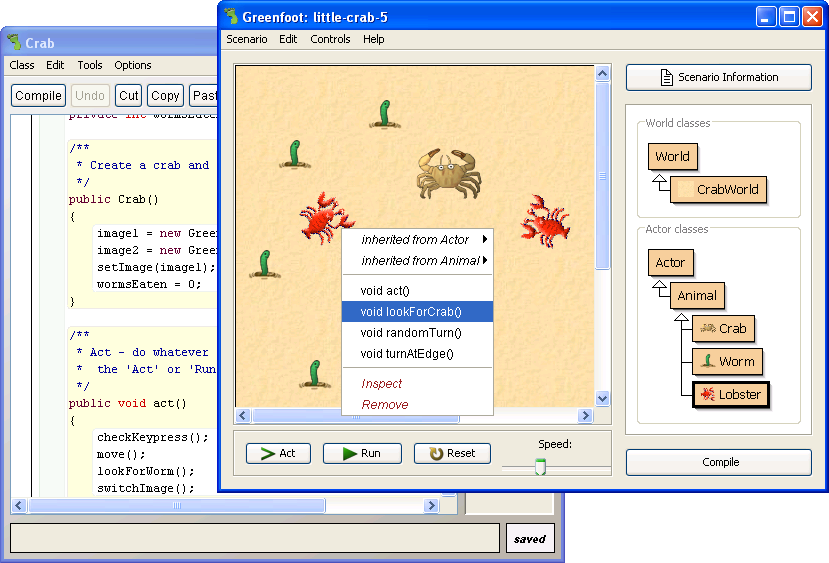
The Greenfoot Java programming offers a highly visual way to teach the basics of object oriented (OO) design through simple user interactions. Aimed at coding beginners from around 11 upwards it's suitable for home-based or classroom learning scenarios.

With a graphical interface (see below) centred around user-defined actors that live in class-based worlds, Greenfoot offers an interactive and fun way to build games and simulations.

However, don't be fooled by the playful interface. All Greenfoot programs are built using standard Java. Behind the scenes there a full source code editor with built-in compiler, syntax-highlighting, scope-visualisation and auto-completion.

So the skills you'll acquire will be applicable to general Java development and other similar object oriented languages.

For Pi owners the pure-Java jar file version is the best option. Simply download the file, move to the download directory, then execute this command in a terminal window:

$ java -jar Greenfoot-generic-230.jar

You could create a desktop short cut which executes the above command for a more convenient single-click solution.

The Greenfoot website has plenty of helpful information and resources. Visit the documentation page to view the introductory tutorials, or take a look at the excellent collection of videos at the Joy of Code YouTube channel.

More Raspberry Pi Coding, Tips and Tricks

Raspberry Pi Java with DrJava

So the Raspberry Pi has a new performance-enhanced port of Oracle Java programming language.

But some of the traditional Java IDEs like Eclipse and Netbeans are large, memory-hogging applications. Is there a more Pi-friendly alternative?

Dr Java is one option. The classic interface has all the features you'd expect, such as syntax highlighting and one-click compilation or execution. There's a useful quickstart guide on the website.

For the Pi the pure-Java jar file version is the best option. Simply download the file, move to the download directory, then execute this command in a terminal window:

$ java -jar drjava-stable-20130901-r5756.jar

You could create a desktop short cut which executes the above command for a more convenient single-click solution (note: it can take a little while for the editor window to appear).

A screenshot of the Dr Java editor with a classic Hello World class appears below.

More Raspberry Pi Coding, Tips and Tricks

Raspberry Pi Java with Geany

The Geany editor is already a popular editor for Python programming.
But it has a Java side too.

Here's a few of the Java-friendly features:

colourful syntax-highlighted Java source code
visual Java class and function navigation
easy code compilation via the 'Build' menu option or F8
easy class execution via the 'Build' menu option or F5

Below is a screenshot of how the classic 'Hello World' class looks in Geany.

More Raspberry Pi Coding, Tips and Tricks

Easy Raspberry Pi Web Development

Would you like to create a website on your Pi but are unsure how get started?

Then Google's Coder for the Raspberry Pi might be for you.

It's simple to get started, just follow these steps:

  1. download the package from the google-coder website
  2. unzip it onto an empty SD card
  3. insert the SD card into your Pi
  4. boot up your Pi
  5. visit coder.local in the Chrome browser

Now you'll have a ready-to-go web development environment, complete with Chrome browser and Node.js web platform.

Visit my Raspberry Pi page for news, reviews, advice and tutorials.

Microsoft: One Big Opportunity

So Steve Ballmer is on his way. His publicised plans for a company-wide reorganisation failed to excite shareholders or markets. They will go down in history as his swan song.

Yet his resignation caused a seven percent rise in Microsoft's stock price. A strong indication now is the perfect opportunity for a fresh start.

While there's any number of internal candidates, it's time to look outside Microsoft's corporate walls. There's a desperate need for fresh blood to invigorate and reenergise the company.

The challenge is to find someone like Facebook's Chief Operating Officer Sheryl Sandberg or Yahoo! CEO Marissa Mayer. Appointing the right person would herald a gripping new chapter in the Microsoft story.

Read more Microsoft analysis posts.

What's the scope of Microsoft's Bing Platform

Microsoft recently launched the Bing Platform for developers.

So, what's the full scope of the Bing platform? The answer is much larger than most people realise. Here's a brief summary in alphabetical order.

Bing Ads, formally known as the adCenter, enables publishers to monetize their websites through pay-per-click advertising scenarios.

Bing Dictionary is based on Microsoft's Encarta World English Dictionary. An associated audio player facility enables users to hear word pronunciations.

Bing Entertainment has searchable, detailed information and reviews on music, movies, TV shows and video games. In addition users have direct access to Bing Online Games through a close partnership with Microsoft Games.

Bing Events is linked to the Zvents database (zvents.com) which hosts a constantly updated collection of upcoming events. Searches reveal event descriptions, dates, times and venues. And there's also a ticket purchase facility.

Bing Finance features include stock searches, company profiles, market statistics, stock ratings, historical data, financial statements and analyst recommendations. Filters screen stocks appropriate for value contrarian, high-yield and bargain investment strategies.

Bing Health aims to help users navigate complex medical topics. Health-related information is gathered from a variety of trusted sources, including the Mayo Clinic, National Institutes of Health and Medicine and the Microsoft acquired Medstory.

Bing Images refines search results by image size, layout, colour (or black and while only) and type. It also incorporates facial recognition technology. Search result pages have an attractive, generated tile layout and an infinite scroll feature.

Bing Local taps into business listings and reviews for your local area. There's a close integration with Bing Maps and Events.

Bing Maps offers high quality road and satellite maps, landmarks, route identification, traffic flow and bird's-eye views. Bing Maps for Enterprise introduces high-resolution 3D panoramas, which allow users to fly over cityscapes and around buildings.

Bing News is a convenient aggregator for a wide range of online news and information.

Bing Recipes serves up foody ideas from data stored by Delish.com, MyRecipes.com and Epicurious.com. Search criteria includes ingredients, methods, courses, cuisine convenience or occasion.

Bing Reference generates semantic indexes to Wikipedia pages. This capability is highly reliant on the natural language search engine technology Microsoft acquired from its Powerset company purchase.

Bing Social finds real-time information from Twitter and Facebook, prioritised on relevance and context. It's currently limited to public feeds from the last seven days.

Bing Shopping is the place to discover online products and goods. Microsoft has developed a number of strategic partnerships, such as with eBay's Commerce Network.

Bing Translator allows users to translate web pages or specific text into over 40 languages (including two Star Trek Klingon dialects). The service offers a side-by-side text comparison and a mouse-hover translation feature.

Bing Travel uses predictive algorithms to determine the best time to purchase airfares and hotel reservations. This technology was the drive behind Microsoft's acquisition of Farecast.com.

Bing Videos has a fast, powerful search engine with multiple categorisations and an in-results-page Smart Preview feature. MSN Video users can access editorial content.

Bing Visual Search appeared in 2012. Powered by Microsoft's Silverlight technology it enables users to refine their search queries through an image-based interface.

Bing Weather is a highly regarded, richly graphical Windows 8 app, complete with animation. It uses data from multiple sources, such as Foreca (foreca.com), to deliver weather reports from around the globe, plus extended 10 day forecasts.

Bing Wolfram Alpha came out of a partnership with the Wolfram Research (wolfram.com). Behind the natural language interface search results are generated using computational algorithms and a knowledge base of curated data, instead of the more usual semantic search engine.

Read more Microsoft analysis posts.

Land of Lisp by Conrad Barski

Over the last few years there's been a strong resurgence in the functional programming paradigm. New languages such as Clojure and Scala, which synthesise functional features with a modern-looking syntax, have engendered enthusiastic communities. While JavaScript, CoffeeScript and TypeScript developers increasingly want to code in a functional style.


Understanding key functional concepts is widely considered to be an essential part of a software programmer's skill set. One which invariably results in higher levels of proficiency with other languages.


However, anyone who has tried their hand at functional programming knows it necessitates a different way of thinking. This mindset shift invariably takes some time to accomplish. Many give up before the proverbial light bulb is illuminated.

What would help is an engaging and entertaining introduction to functional programming. Land of Lisp aims to provide just such a solution.

It’s a comprehensive 500 page guide which covers the full breadth of functional programming topics, from using simple lists to defining your own macros. Throughout exercises and code examples are practical in nature, with an underlying gaming theme.

The author's informal style, combined with a fluid pace, well structured content and those wacky-yet-informative illustrations, are a breath of fresh air in the often insular world of functional programming.

Although the book’s content and code listings are based around CLISP (an ANSI Common Lisp implementation), the lessons learned can be applied to other Lisp dialects, or languages that support a functional style of coding.


The question is whether this book succeeds in easing the path to functional programming mastery? I think it does.

TypeScript & CoffeeScript: A Better JavaScript

JavaScript is a hugely popular language. Its scope extends well beyond the classic web development scenario. Today developers are able to create cross-platform mobile apps and full-sized applications in pure JavaScript.

Google, Appcelerator, PhoneGap and many others have active, well resourced JavaScript-based projects and compilers are springing up all over the place.

Nevertheless JavaScript coding can be a challenge, even for the professional developer. As code listings grow in size and complexity the language's many shortfalls induce to a steep increase in bug count and raise developer frustration.

Using a quality IDE will certainly help. But, how about a new language with a cleaner, modern-looking syntax? One that requires less lines of code for the same functionality, yet is still 100% JavaScript compatible.

Here I'll take a brief look at two, TypeScript and CoffeeScript.


TypeScript version 0.9 was unwrapped in front of Microsoft's developer community during Microsoft's Build 2013 event by Anders Hejlsberg.

In common with many recent Microsoft initiatives there's a strong lean towards openness, exemplified by the Apache 2 licence and CodePlex-hosted source code. In fact, TypeScript is a preview of what to expect in the upcoming ECMAScript 6 standard.

The open source, open specification, cross-platform compiler is itself written in TypeScript. Type declarations are removed by the compiler and the ECMA standard JavaScript output runs in any browser and on any host.

TypeScript is a superset of JavaScript. So developers can start with a JavaScript listing then use whichever TypeScript features seem most appropriate. The addition of types and generics, plus improved class definitions and 'intellisense' support allow developers to create well structured code and introduce fewer bugs.

TypeScript header files add type information to existing libraries. A github-hosted project called DefinitelyTyped already contains an impressive collection of '.ts' definition files covering many popular libraries and frameworks, including jQuery, MongoDB, Node.js and D3.js.

There are IDE plugins for Visual Studio and WebMatrix, plus support for editors such as Sublime Text, Emacs and Vim editors. However, at present only Microsoft's Visual Studio 2012/2013 tool delivers comprehensive support for all TypeScript's features.

To discover more watch Anders Hejlsberg's hour long Build 2013 talk or navigate to the TypeScript preview website and select the 'Play' mode.


CoffeeScript appeared in 2009 when Jeremy Ashkenas placed an early version on GitHub. The stable 1.0 version appeared in December 2010.

CoffeeScript aims to increase developer productivity via syntax influences from Python, Ruby and Haskall. It's a succinct language, with noticeably less syntactic fluff. Consequently, a CoffeeScript listing is not only easier to read, understand and debug, but typically requires less than half the code when compared with JavaScript.

CoffeeScript code is trans-compiled into pure JavaScript. This means any Javascript framework or library can be referenced, including the ever popular jQuery and Prototype products. There's support in Node.js and Ruby On Rails version 3.1, plus an online tool to convert existing JavaScript code into CoffeeScript.

To find out more checkout the free open source introduction to CoffeeScript.

Click to read more analysis articles and posts.

Microsoft Under Pressure

Microsoft is under pressure as never before.

Reaction to Windows 8 is at best mixed.
Millions of RT Surface devices lie unsold in warehouses.
Nokia isn't selling nearly enough Windows Mobile smartphones.
First quarter 2013 revenue was down eight percent.
Profits are dwindling fast.
And now there's been dramatic share sell-off.

It puts even more pressure on Ballmer's company-wide reorganisation, which amounts to one of the biggest upheavals since Microsoft's inception in 1972.

Ballmer's can only hope his call to arms memo will have far greater impact than the 1995 Bill Gates memo.

Read more Microsoft analysis posts.

How much should an RT Surface tablet cost?

With millions of RT Surface tablets gathering dust on warehouse shelves, Microsoft has slashed the price.

But is it enough? What is the right price?

After all, it's certainly a powerful device with a rich, powerful operating system capable of both desktop and tablet functionality. Yet, it doesn't have allure of an Apple device - and probably never will.

However, presenting consumers with a straight, equal-cost choice between a 7.9" iPad Mini or a 10.6" RT Surface, complete with free touch keyboard cover, might prove interesting.

Would that be enough to swing the pendulum in Microsoft's favour?

Read more Microsoft analysis posts.

Learn Python - PyGame Complete App

Over the last few posts we've looked at PyGame installation, events, event handling, colour definition, initialisation and drawing.

Now it's time to put all the ingredients together in the form of a complete app.

Here's the listing:

1
2
3
4
5
6
7
8
9
10
11
12
13
14
15
16
17
18
19
20
21
22
23
24
25
26
27
28
29
30
31
32
33
35
35
36
37
38
39
40
41
# PyGame Skeleton

import pygame, sys, random

def check_events(pos):
  # loop through all events
  for event in pygame.event.get():
    if event.type == pygame.QUIT:
      sys.quit()
    if event.type == pygame.MOUSEBUTTONDOWN:
      # draw a coloured disc at the current mouse position
      discSize = random.randint(5,50)
      r = random.randint(100,255)
      g = random.randint(100,255)
      b = random.randint(100,255)
      discCol = [r,g,b]
      pygame.draw.circle(screen, discCol, pos, discSize)

def run():
  # get mouse position
  pos = pygame.mouse.get_pos()

  # check events
  check_events(pos)

  # update the screen with what we've drawn
  pygame.display.flip()

  # control the draw update speed
  clock.tick(50)

# initialise pygame
pygame.init()
screen = pygame.display.set_mode([500,400])
screen.fill(pygame.Color('black'))
pygame.display.set_caption("My Game")
clock = pygame.time.Clock()

# loop until the user clicks the close button
while True:
  run()

Take this basic structure and add your own enhancements. Maybe additional event handling or drawing different shapes.

I hope you've enjoyed this series. Happy coding.

Visit my Raspberry Pi page for news, reviews, advice and tutorials.

Learn Python - PyGame Skeleton

Over the last few posts we've looked at PyGame installation, events, event handling, colour definition, initialisation and drawing.

Now it's time to put all the ingredients together in the form of an complete app skeleton.

Here's the listing:

1
2
3
4
5
6
7
8
9
10
11
12
13
14
15
16
17
18
19
20
21
22
23
24
25
26
27
28
29
30
31
32
33
35
35
36
37
38
39
40
41
# PyGame Skeleton

import pygame, sys, random

def check_events(pos):
  # loop through all events
  for event in pygame.event.get():
    if event.type == pygame.QUIT:
      sys.quit()
    if event.type == pygame.MOUSEBUTTONDOWN:
      # draw a coloured disc at the current mouse position
      discSize = random.randint(5,50)
      r = random.randint(100,255)
      g = random.randint(100,255)
      b = random.randint(100,255)
      discCol = [r,g,b]
      pygame.draw.circle(screen, discCol, pos, discSize)

def run():
  # get mouse position
  pos = pygame.mouse.get_pos()

  # check events
  check_events(pos)

  # update the screen with what we've drawn
  pygame.display.flip()

  # control the draw update speed
  clock.tick(50)

# initialise pygame
pygame.init()
screen = pygame.display.set_mode([500,400])
screen.fill(pygame.Color('black'))
pygame.display.set_caption("My Game")
clock = pygame.time.Clock()

# loop until the user clicks the close button
while True:
  run()

Take this basic structure and add your own enhancements. Maybe additional event handling or drawing different shapes.

I hope you've enjoyed this series. Happy coding.

A post from my Learn Python on the Raspberry Pi tutorial.

Learn Python - PyGame Screen Drawing

With our PyGame code initialised let's draw something on the screen.

Here's a code snippet:

# get mouse position
pos = pygame.mouse.get_pos()

# define a disc size and colour
discSize = random.randint(5,50)
r = random.randint(100,255)
g = random.randint(100,255)
b = random.randint(100,255)
discCol = [r,g,b]

# draw a disc at the current mouse position
pygame.draw.circle(screen, discCol, pos, discSize)

# update the screen with what we've drawn
pygame.display.flip()

# control the draw update speed
clock.tick(50)

In the first statement we call pygame.mouse.get_pos to return the mouse coordinates and store them in a variable called pos. As we'll see later this code will be called in a endless loop. So, on each loop iteration (which means many times a second) pygame.mouse.get_pos captures the current mouse position.

In this example we draw a simple disc on the screen, so the next five statements set a disc size and colour. Note we're using the random package here to vary the size and colour of the disc each time.

Next we call the pygame.draw.circle function to draw a coloured disc. There are four parameters. The first parameter is our screen object (which we created in the initialisation section) onto which the disc is drawn. The second parameter contains the RGB discCol value we defined earlier. Parameter three contains the mouse position coordinates as stored in the pos variable. And the fourth parameter declares the disc radius using the discSize variable.

Now we come a particularly important function pygame.display.flip. This does the magic necessary to render our graphical elements on the screen. Without this line we'd see nothing. I say magic because there's loads of clever stuff going on under the covers to create smooth, flicker-free animation. This involves many hundreds of lines of Python code, however all we need to do is call a single function.

The final statement is also important. It controls the update speed of the screen display using the function clock.tick. Remember, we created the clock object in the initialisation section. The tick function parameter fixs the update speed. The lower the number the fewer the number of screen updates.

A post from my Learn Python on the Raspberry Pi tutorial.

Learn Python - PyGame Init Code

Before we can use any of the PyGame module's features we'll need to a few initialisation statements.

Here's a simple example:

pygame.init()
screen = pygame.display.set_mode([500,400])
screen.fill(pygame.Color('black'))
pygame.display.set_caption("My Game")
clock = pygame.time.Clock()

One the first line there a call to the pygame.init function. This does a whole load of very clever stuff that we don't need to worry about. That's the power of using modules. Suffice to say, after this call we only need a few additional lines of code.

Next a screen object is created using the pygame.display.set_mode function. The parameter is a list (hence the square brackets) which contains two numbers. These numbers correspond to the width and height of the screen in pixels. So, here the screen object created will be 500 pixels wide and 400 pixels high.

Now we have a screen object we can do things with it. As an example the following line calls the screen.fill function to set a background colour to black. We'll be using the screen object again later on.

The pygame.display.set_caption statement simply sets the window title, as defined by the text string parameter.

And finally a clock object is created using the pygame.time.Clock() function. A clock object allows to adjust the timing of drawing events within the game. Once again, we'll see how this is used later.

A post from my Learn Python on the Raspberry Pi tutorial.

Learn Python - PyGame Colours

There's a number of ways to specify colours in PyGame. So, it's worth examining the options available.

Arguably the simplest option is to specify basic colours is by name, as here:

backgroundCol = pygame.Color('black')
textCol = pygame.Color('white')
lineCol = pygame.Color('magenta')

However, assigning a name (and recalling that name) for every possible colour isn't practical. So, a more flexibility solution is to use RGB colour values.

Here's an example:

backgroundCol = [0,0,0]
textCol = [255,255,255]
lineCol = [255,100,100]

The three numbers relate to the red, green and blue components of a colour. As each RGB number ranges from 0 to 255, the total number of RGB colour combinations is 256 x 256 x 256, or over 16 million.

Setting a value of [0,0,0] means no red, green or blue colour. So the backgroundCol setting will be black. To define white we'd need to set all three colours to their maximum value, namely [255,255,255], as in the textCol variable. While the lineCol variable has pinkish colour value due to the dominance of red.

A post from my Learn Python on the Raspberry Pi tutorial.

Learn Python - PyGame Event Handling

Just like a GUI program our game will run in an endless loop. On every loop cycle we'll need to check for new events.

So, it's good practice to define a function to hold all your event handling code. Then it's a simple matter to call this function every loop cycle.

Here's a barebones example:

def handleEvents():
  # loop through all events
  for event in pygame.event.get():
    if event.type == pygame.QUIT:
      sys.quit()

At any particular moment there may be many different events. We'll need to test them all, so there's a for loop to iterate through the full event list.

In this barebones example we only test for one event, namely the QUIT event. If this has occurred the game is closed using the sys.quit() function call.

A post from my Learn Python on the Raspberry Pi tutorial.

Learn Python - PyGame Events

A key part of PyGame coding is handling events.

Remember, we've already used events when we explored handling GUI events.

The PyGame module defines a number of events. Here's the list:

QUIT
KEYDOWN
KEYUP
MOUSEMOTION
MOUSEBUTTONUP
MOUSEBUTTONDOWN
JOYAXISMOTION
JOYBALLMOTION
JOYHATMOTION
JOYBUTTONUP
JOYBUTTONDOWN
VIDEORESIZE
VIDEOEXPOSE
ACTIVEEVENT
USEREVENT

As you can see they cover keyboard, mouse and joystick actions plus the quit event generated by closing the game window.

Importantly there's a userevent which allows use to handle our own custom events.

A typical program will use at least one or two of these events. Later we'll create a function to handle these events.

A post from my Learn Python on the Raspberry Pi tutorial.

Learn Python - PyGame Installation

These PyGame installation instructions presume you're running the official Raspbian images on your Raspberry Pi (and it works for any Debian-flavour Linux image).

First, ensure your Raspberry Pi is connected to the Internet.

Next open an LXTerminal window and type the following command:

sudo apt-get install python-pygame

Enter the password you used to login in with, and reply 'y' to any prompts.

Now you should be able to run any PyGame program, or create your own.

A post from my Learn Python on the Raspberry Pi tutorial.

Learn Python - PyGame Overview

There are many similarities in GUI and game program design concepts, code structure and programming techniques. So, the knowledge we gained earlier while coding GUI programs with Tkinter will be an excellent foundation for games creation.

A fully functioning game will typically involve graphics, animation, collision detection, sound effects, music tracks, scoring and handling user input events. Quite a challenge.

Yet, the PyGame module is more than capable of meeting this challenge.

PyGame can draw lines, shapes and surfaces; write text in a large range of fonts and styles; load, manipulate and move images; play sounds, music tracks and videos; consume keyboard, mouse and joystick input events; interact with files, CDROM disks and cameras; and much more.

The official PyGame website has a comprehensive list of module functionality.

In the next series of posts we'll walk through a very simple animation code listing to identify the key building blocks required by any PyGame app. In the process we'll revisit some Python programming techniques and pick up a few new coding skills.

A post from my Learn Python on the Raspberry Pi tutorial.

Learn Python - Why PyGame?

Trying your hand at game programming is an excellent way of honing existing coding expertise and gaining new skills.

Unfortunately, creating even a simple game with the Python language and its Standard Library requires considerable levels of skill and knowledge.

However, and not for the first time, Python's extensive collection of modules comes to the rescue. The PyGame module is designed to ease the path to game creation with a rich set of specialised, yet easy-to-use functionality.

In the following posts we'll explore some of PyGame's potential and demonstrate how it can kick-start your game programming skills.

PyGame Overview
PyGame Installation
PyGame Events
PyGame Event Handling
PyGame Colours
PyGame Init Code
PyGame Screen Drawing
PyGame Complete App

A post from my Learn Python on the Raspberry Pi tutorial.

Learn Python - Tom The Turtle

Up to now we've drawn some patterns and shapes, but we've seen nothing that looks much like a turtle. Let's put that right.

Before starting to issue move commands we can create a turtle object. We can give this object a name, and define a turtle-like shape.

It's done like this:

tom = turtle()
tom.shape("turtle")
tom.color("red")

These three lines will create a turtle called Tom, with a real turtle shape, filled with a bright red colour.

We can command Tom to move around the around the screen just as before, like this:

tom.circle(100)
tom.right(45)

Next time I'll show you how to control two turtles at once for some synchronised stomping.

A post from my Learn Python on the Raspberry Pi tutorial.

Learn Python - Turtle Shapes

This time, rather than drawing patterns with lines we'll use shapes filled with colour, like this...

Let's get started. Open an new file in your editor and save it as 'turtle-shapes.py'.
Now type in the code below:

from turtle import *

# set a shape and colour
shape("circle")
shapesize(5,1,2)
fillcolor("red")
pencolor("darkred")

penup() # no drawing
goto(0, -100)

# main draw loop
for i in range(72):
  forward(10)
  left(5)
  tilt(7.5)
  stamp()

exitonclick()

The first thing this program does is define the turtle shape with the shape function call. Here we are going to use a circle, but it could also be a triangle or a square.

On the next line we have a shapesize function call with three parameters. These specify the shape length, width and outline thickness respectively. Here the parameter values 5,1,2 will stretch our circle to create a thin ellipse.

We fill the ellipse shape with colour using the fill function. Here we've set it to red. We've also set the pen colour, to provide a contrasting shape outline colour. So, now our turtle is solid red ellipse with a dark red outline.

The next line issues a penup command. This raises the turtle's pen and stops it from drawing a line as it moves. It will become clear why we do this shortly.

By default our turtle is positioned at the centre of the window. However, for this program we need to move it a little first, to create room for our pattern. Although we could use the standard turn and movement commands, this time we'll use the goto function call because it can be done in a single command.

The goto command instructs the turtle to move to a new position relative to its current location. The move is specified as X and Y axis movements. The first X parameter is zero, so we won't move left or right. But, the Y value is -100. This moves the turtle down the screen by 100 steps.

Now we have the main draw loop, which repeats 72 times. Each time it will move forward 10 steps, turn left 5 degrees, tilt our ellipse shape by 7.5 degrees and do a stamp. What does stamp do? Stamp will leave an impression of our turtle, namely our red ellipse, on the screen.

Save the code and run the program, to see the stamped red ellipses gradually build up a pattern. Yet there's loads of ways to modify this program.

Try different values for forward, left and tilt in the loop and discover what sort of patterns are generated. You might be surprised at the results.

The shape of the ellipse can be altered by using different parameter values in the shapesize function call. And, of course, you're free to use any colour, or colours, you like.

A post from my Learn Python on the Raspberry Pi tutorial.

Learn Python - Turtle Patterns

Now let's draw some circles to create a pretty pattern, like this...

Does it look somewhat familiar? For those who remember, it's strikingly similar to the designs generated by the classic Denys Fisher Spirograph game.

To start use the Geany 'File->Save As' menu option save the square drawing program as 'turtle-circles.py'.

We only need to do a minor code change, namely replace the 'forward(200)' line with 'circle(100)'. The new listing will look like this:

from turtle import *

pencolor("blue")
pensize(5)

for i in range(4):
  circle(100)
  right(90)

exitonclick()

Save your changes and run the program. We now have four circles arranged in a pattern.

Let's make a few more changes. Modify the code to look like the listing below:

from turtle import *

pensize(5)

for i in range(4):
  for c in ["red","green","blue"]:
    pencolor(c)
    circle(100)
    right(30)

exitonclick()

Save your changes and run it again.

As you can see we now have two loops, one inside the other. This will draw a circle a total of twelve times (4 x 3). And by changing the pen colour in the inner loop, we've generated a multi-coloured pattern.

Are you starting to see the possibilities turtle graphics can offer? Next time we'll move onto creating solid-colour shapes.

A post from my Learn Python on the Raspberry Pi tutorial.

Learn Python - Draw In Colour

While our turtle move program looks good, we can make a few improvements.

There are two things we can fix:
• Firstly, there's quite a bit of repeated code
• Secondly, the thin black line looks a little drab.

So, let's edit the code as shown in the listing below:

from turtle import *

pencolor("blue")
pensize(5)

for i in range(4):
  forward(200)
  right(90)

exitonclick()

Save the code and run the program to discover what happens now. See the difference?

After the import statement we've added the pencolor and pensize commands. These settings will cause our turtle to draw a thick blue line.

More importantly, we've put the movement commands into a for loop. This loop repeats the forward and right commands four times - a much neater coding solution.

A post from my Learn Python on the Raspberry Pi tutorial.

Learn Python - Move That Turtle

Let's dive in and draw squares with the turtle graphics module and a sequence of turtle movement commands.

In the Geany editor and create a new file called 'turtle-square.py', and enter the following code:

from turtle import *

forward(100)
right(90)
forward(100)
right(90)
forward(100)
right(90)
forward(100)
right(90)

exitonclick()

Save your typing and run the program using the Geany 'Build->Execute' menu option, or F5 key. You should see a new window appear and a square being drawn.

So, what's actually going on here?

First there's the import statement. As we saw earlier with TKinter GUI module using this style of import means we don't need to use a 'turtle.' prefix for every function call.

Now for our turtle move commands. Imagine you are drawing a square on a piece of paper using a pencil and a ruler. We can imitate the motion of the pencil with a series of directional and turn commands sent to our turtle.

The first command is the 'forward(100)' function call. This will move 100 steps in the direction the turtle is already pointing, drawing a line as it goes. Next we need to turn the turtle. The command 'right(90)' turns the turtle by a specified angle, in this case it's 90 degrees.

Now we simply repeat the 'forward' and 'right' commands another three times, to finish drawing our square.

The last line just ensures we can see what the turtle has drawn before the window closes. The program waits until we click somewhere inside the window - or the window's close button is clicked.

And there you have it, your first turtle graphics program.

A post from my Learn Python on the Raspberry Pi tutorial.

Learn Python - The Turtle Module

So, how do we access all this fun with Python? Well, it's all down to a module called turtle, which has a collection of Logo-like commands, implemented as functions - plus some useful window and event management features.

The turtle module's functionality is split into a number of categories. In broad terms these are:

 turtle movement
 pen control
 colour and fill settings
special shapes
window management
event handling

Installation

The turtle module is already installed with Python 3, but not always there with Python 2.7. To check start new a Python interactive session and enter this statement:

>>> import turtle

If you see an error message about a missing module, don't worry. Presuming you are running the standard Debian Linux image, make sure the Raspberry Pi is connected to the Internet, open a Terminal window and type the following command:

sudo apt-get install python-tk

If prompted enter the password you used to login in with, and reply y to any prompts.

Now we can write our first turtle graphics code.

A post from my Learn Python on the Raspberry Pi tutorial.

Learn Python - What is Logo?

Logo is an interesting computer language.

While its origins go back to the 1960s, in recent times Logo has been associated with something called turtle graphics. The idea is to draw pictures and generate patterns by issuing commands to a screen-based turtle.

Logo has a lot going for it. It's a language based on simple commands, using words that even the youngest primary school pupil will understand. Words such as 'forward', 'backward', 'left' and 'right'.

Despite being very easy to learn, Logo programs illustrate a number of very important concepts. Concepts that include geometry, graphical design, various computer programming techniques, and an introduction to artificial intelligence (AI) through Logo-controlled robots.

Unsurprisingly, these attributes caught the eye of educators. Educational establishments right across the board, from Primary Schools all the way to Universities, have incorporated Logo programming into their classrooms and lectures.

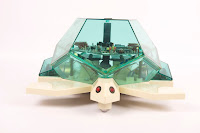
When combined with mechanical turtles - floor-traversing robotic devices drawing on large sheets of paper with coloured pens - it seldom fails to generate keen interest and attention-grabbing engagement with students of any age. One of the most successful turtle robots was the Valiant Turtle (see image). Design by Dave Catlin 1983 it won a Best of British Design award and was manufactured right up until 2011.

In future posts I'll demonstrate how we can use Python to emulate the Logo programming language, while showing just how simple and fun turtle graphics can be.

A post from my Learn Python on the Raspberry Pi tutorial.

Learn Python - GUI File Search App

Now we've seen how a typical GUI program is structured, let's try a more advanced example.

It will be based on the File Walk App we created earlier, which searched the file system, using the os.walk function to obtain a list of files and sub-directories.

Open another new file in Geany, save it as 'tk-search.py' and type in the code below:

1
2
3
4
5
6
7
8
9
10
11
12
13
14
15
16
17
18
19
20
21
22
23
24
25
26
27
28
29
30
31
32
33
34
35
36
37
38
39
40
41
42
43
44
45
46
47
48
49
50
51
52
53
# A GUI search program using tkinter
# Created by David Briddock

from tkinter import *
import os

# initialise main window
def init(win):
  win.title("File Search")

  labelPath.grid(row=0, column=0, sticky="W")
  entryPath.grid(row=1, column=0)
  labelEnding.grid(row=2, column=0, sticky="W")
  entryEnding.grid(row=3, column=0)
  btnSearch.grid(row=4, column=0)
  fileList.grid(row=0, column=1, rowspan=5)
  yscroll.grid(row=0, column=2, rowspan=5, sticky="NS")

  fileList.configure(yscrollcommand = yscroll.set)
  yscroll.configure(command = fileList.yview)
  entryPath.insert(INSERT, "/home")
  entryEnding.insert(INSERT, ".py")

# find button callback
def search():
  # get start directory and file ending
  startDir = entryPath.get()
  fileEnding = entryEnding.get()

  # clear the listbox
  fileList.delete(0, END)

  # find matching file and fill listbox
  for path, dirs, files in os.walk(startDir):
    for fileName in files:
      if (fileName.endswith(fileEnding)):
        fileList.insert(END, path+"/"+fileName)

# create top-level window object
win = Tk()

# create widgets
labelPath = Label(win, text="Starting Path")
entryPath = Entry(win, width=12)
labelEnding = Label(win, text="File Ending")
entryEnding = Entry(win, width=12)
fileList = Listbox(win, width=80)
yscroll = Scrollbar(win, orient=VERTICAL)
btnSearch = Button(win, text="Search", width=8, command=search)

# initialise and run main loop
init(win)
mainloop()

While there are quite a few lines of code here, I hope you can pick out the function definitions and typical GUI app structure.

We've still have our tkinter module import on line 4, while line 5 imports the os module. You'll also notice the init function and another event callback function, this time called search. More on these later.

More Widgets

On line 40 we create the top-level window object. This time we need quite a few widgets. These are created on lines 42 to 49.

The labels and entry boxes will provide our user input interface. The label text is set using the text configuration parameter. The two entry fields will hold the starting directory and file ending strings, and have a display width assignment of twelve characters.

On line 47 a listbox widget is created. This will hold a list of matched files. Specifying a width of 80 characters will cater for any long path names. A search might find many files. So, we need a vertically oriented scrollbar. We'll 'attach' this scrollbar to the listbox later.

And finally, on line 49, we create a button widget to kick off the search operation. The three parameters specify the button label text, the callback function name, and a width of eight characters.

Lines 52 and 53 call the init function and start the main window loop, just like we saw in the Basic GUI App post.

Using Grid Layout

Now back to the init function. With more widgets it's quite a bit longer than before, and there's also something new to learn. Our widgets need to be positioned in particular locations. Luckily, the Tkinter module has a built-in grid layout feature.

You can think of a grid layout as a collection of empty boxes or cells, organised into rows and columns - very like the cells in a spreadsheet. The cells are numbered from the top left corner starting from zero. A widget is placed in a particular grid cell with the widget's grid function.

We start on line 11 with the cell at column zero row zero, which will contain the starting directory label widget. On line 12 we populate the cell in column zero row one with the starting directory entry widget. Lines 13 and 14 repeat this process for the file ending's label and entry widgets for rows three and four. On line 15 we add the search button to row five in column zero.

By now I'm sure you noticed the sticky configuration parameter on the labels. The 'W' setting means 'West' and ensures the label text will line up on the left hand side of the column.

The second column, column one, only contains the listbox widget. However, the rowspan configuration parameter will stretch it to fill five rows - matching the number or rows we assigned in column zero.

The final column has the scrollbar. This is also stretched over five rows and has a 'NorthSouth' stickiness to ensure it fills the full column space. We 'attach' the scrollbar to the listbox using the statements on lines 19 and 20. This will ensure the listbox contents scroll when the scrollbar is moved.

The last two lines of the function, 21 and 22, set default text string values for the entry widgets.

The Search Callback

Now for the search function. Remember this is called when the search button is clicked, as per the callback setting on line 49. The first two lines, 27 and 28, extract the contents of the entry widgets and store them in two string variables, startDir and fileEnding.

Line 31 deletes all the items in the listbox, to remove any files from a previous search.

Our search is done in lines 34 to 37. Line 34 starts a loop and calls the os.walk function with our startDir string. This function returns a list of paths, files and sub-directories. Line 35 is another loop which extracts each file in the file list, and stores it in the fileName variable.

The conditional if statement on line 36 compares the end of the fileName string with our entered fileEnding. If the test is True then it adds a new string to the listbox, using the path and file name.

And that's it. Run the program using Geany's Build->Execute menu option, or F5 key.

Experiment by trying different file endings and starting directories.

Make It Your Own

As we've seen a GUI program requires quite a bit more code than a simple terminal-based one. However, the flexibility offered by a widget-based user interface is certainly worth the effort.

GUI programming is a big subject. In this short article we've barely scratched the surface. The possibilities for refinement are almost endless. For example, you could change a widget's size or colour, add new widgets, or create a completely different layout.

Python 2.7

Remember, for Python 2.7 you'll need to install Tkinter. If you see a message that says 'No module named Tkinter' then take a look at my previous Installing Tkinter post.

A post from my Learn Python on the Raspberry Pi tutorial.

Hack Minecraft with Python on the Raspberry Pi

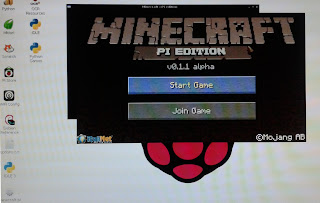
Mojang recently released their free Minecraft: Pi edition - complete with hackable Python API.

Would you like to learn how to hack Minecraft with Python on your Raspberry Pi?

This week's Micro Mart magazine (issue 1257) contains the first of my two part mini-series on Pi Minecraft hacking.

Part one guides you through Minecraft installation before demonstrating how to interact with a live running game with Python's interactive mode and simple statements.

Part two dives further into the API with a step-by-step tutorial on creating a Minecraft hack module.

Here are a few extracts from part one:

There are many reasons to try Minecraft hacking. It's a visually interactive way to experiment with the Python language and so an ideal coding project for the novice Python coder.

Mojang's supplied Python application programming interface (API) ensures you're able to make dramatic physical changes to the Minecraft world with through code-driven crafting. With this API even a small program can offer a surprising amount of game functionality.

And, of course, it's great fun.

The Python modules that implement this package consist of the main minecraft module (minecraft.py), plus the block management (block.py), event handling (event.py), utility (util.py), coordinate conversion (vec3.py) and client-server communication (connection.py).

Are you starting to see the potential of Mojang's Python API? Using these API function calls you can dramatically change your world.

So, let your imagination run free. Python code can rapidly generate new landscapes, construct homes, build defences, plant crops, and so much more.

Also see my Learn Python on the Raspberry Pi tutorial.

Learn Python - Basic GUI App

Now it's time to write a GUI app.

Boot up your Raspberry Pi and open your Python editor. Next open a new file and save it as tk-basic.py in the Desktop's Python folder.

Now type in the code below:

1
2
3
4
5
6
7
8
9
10
11
12
13
14
15
16
17
18
19
20
21
22
23
24
25
# A basic GUI program using tkinter
# Created by David Briddock

from tkinter import *
from tkinter import messagebox

# initialise main window
def init(win):
  win.title("My GUI")
  win.minsize(200, 50)
  btn.pack()

# find button callback
def hello():
  messagebox.showinfo("Hello", "Callback worked!")

# create top-level window object
win = Tk()

# create a widget
btn = Button(win, text="Hello", command=hello)

# initialise and start main loop
init(win)
mainloop()

Before we run this app let's examine the code in detail.

Basic Flow

After the program-level comments there's a tkinter module import statement on line 4. However, you'll notice it's a little different to the ones we've used before.

What this style of import does is alleviate the need to prefix all the tkinter modules constants and functions. We'll need quite a few tkinter constants and functions for any reasonably sized GUI program, so this import option will help de-clutter the code - and save quite a bit of repetitive typing.

On line 5 there's a more specific import statement for the tkMessageBox module.

In order follow the program execution flow we need to skip past the function definitions and look further down the listing.

Window And Widget Creation

At line 18 we create a top-level window object and assign it to the variable win.

On line 21 we have the one and only widget, a button. When we create a widget we need to say where it fits in the window hierarchy. This is done by specifying the parent window as the first parameter. Widget characteristics are set by defining one or more optional parameters. Here we have specified two.

The text parameter will set the button's text label. The command parameter defines the callback function name. When a mouse click event occurs for this button, the named function is called, in this case hello.

Initialise And Loop

It's lines 24 and 25 that hold the key to the program's operation. On line 24 we call the init function to perform any initialisation operations. We'll look at this in detail shortly.

On line 25 there's the main GUI loop. It's an endless loop which only terminates when the window is closed. Entering this loop will cause the main window to be displayed, along with any widgets we've defined. Once running it will capture and process all keyboard and mouse events. If these events are associated with any widgets, such as our button, the appropriate callback function will be called.

Initialisation Function

As we saw earlier, line 24 calls the init function. In this basic program init contains just three lines.

On line 9 we set the top-level window title, which will appear in the titlebar. On the next line we specify the minimum size for our window in pixels. In this case it's 200 pixels wide and 100 pixels high.

The final function statement, on line 11, calls the Tkinter pack function on behalf of our button. This adds the button to its parent window, namely the top-level window win.

The Callback Function

The callback function, hello, is defined on line 14. Remember, callback functions never have any parameters.

Once again this is a small function with just a single line of code, which calls the tkMessageBox module function showinfo. This function creates a new popup-style window, and you'll notice it has two parameters. The first parameter will define the string in the window's titlebar. While the second parameter is the message that will appear inside the popup window.

Run The App

Now we can execute the app, using the Geany Build->Execute menu option or the F5 key. After the window appears click on the button to see the message window popup.

Because the callback is only associated with the button, if you click somewhere else inside the top-level window nothing happens.

Python 2.7 code

Here's the Python 2.7 version of the code:

1
2
3
4
5
6
7
8
9
10
11
12
13
14
15
16
17
18
19
20
21
22
23
24
25
# A basic GUI program using Tkinter
# Created by David Briddock

from Tkinter import *
import tkMessageBox

# initialise main window
def init(win):
  win.title("My GUI")
  win.minsize(200, 50)
  btn.pack()

# find button callback
def hello():
  tkMessageBox.showinfo("Hello", "Callback worked!")

# create top-level window object
win = Tk()

# create a widget
btn = Button(win, text="Hello", command=hello)

# initialise and start main loop
init(win)
mainloop()

A post from my Learn Python on the Raspberry Pi tutorial.

Learn Python - Installing Tkinter

Python 3.x

If you're using a recent version of Python 3, say version 3.6 or 3.7, then the tkinter module is preloaded. So you can move on to the next tutorial.

Python 2.7

However, if you're using Python 2.7 then you might need to install the Tkinter module.

To check if it's already installed open a new Python interactive session, then enter this statement (making sure there's an uppercase T in Tkinter):

>>> import Tkinter

Did you see an    ImportError: No module named Tkinter    error message?

If the answer is yes then follow the installation steps below (which are applicable to the Raspbian Jessie distro or the older Raspbian Wheezy image).

Ensure your Raspberry Pi is connected to the Internet, open an LXTerminal window and enter this command:

sudo apt-get install python-tk

If prompted enter the your login password, and reply y to any prompts.

Now we're ready to create GUI apps.

A post from my Learn Python on the Raspberry Pi tutorial.

Learn Python - GUI Event Handling

Event handling is a critical aspect of GUI app development. Events can be generated in various ways, keyboard and mouse interaction being two obvious examples.

A GUI program must be able to determine which key was pressed. Not just the alphanumeric keys, but also shift keys, control keys, alt keys, function keys, cursor keys, the escape key and special keys like the Windows key.

As for the mouse, a program needs to determine the current coordinates of the mouse pointer, whether a mouse button has been clicked and if the scroll wheel has moved.

How do we do this? In a GUI program it's done with something called 'callbacks'. A callback is registered against a particular widget, and associated with a specific function. When an event occurs in the widget's window area, the function is called. This function can then analyse the event type and respond appropriately.

Once again all this functionality is contained within the tkinter module, so creating a GUI callback is a straightforward operation.

A post from my Learn Python on the Raspberry Pi tutorial.